As the world of artificial intelligence expands, developers are moving from single AI models to complex, multi-agent systems where numerous specialised agents collaborate to solve problems.
The Agent Communication Protocol (ACP) offers a solution, providing a unified language for agents to communicate, making systems more scalable, flexible, and easier to manage.
This guide provides a detailed walkthrough for building a scalable multi-agent communication system using the Agent Communication Protocol.
What is the Agent Communication Protocol (ACP)?
The Agent Communication Protocol (ACP) is an open protocol designed to standardise the way AI agents communicate with one another. Think of it as a common language, like English or Mandarin, but for software agents.

It provides a unified interface that allows agents to work together seamlessly, regardless of the programming language or framework they were built with. This solves a major headache in developing multi-agent systems, where integrating agents often requires custom, brittle code that breaks every time an agent is updated.

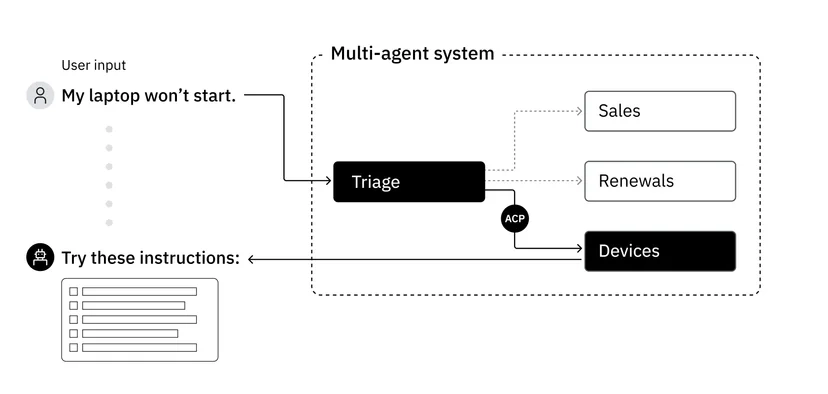
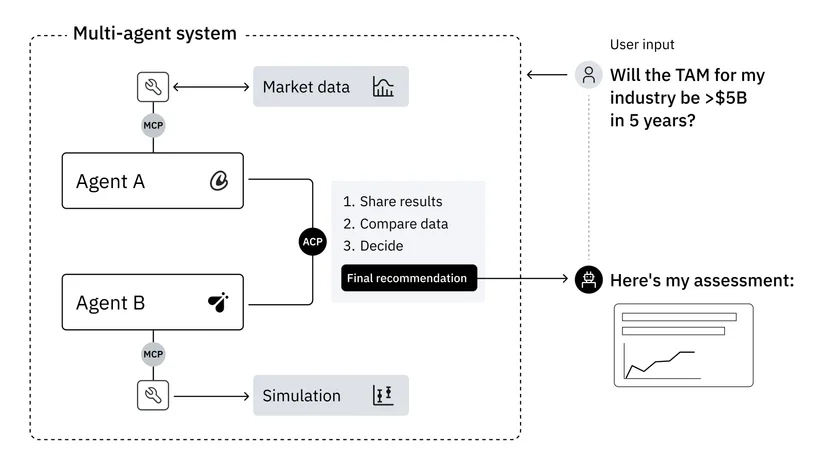
Developed by IBM Research and now part of the Linux Foundation's BeeAI project, ACP is built on a simple yet powerful client-server architecture. It enables seamless interaction between AI clients and cloud-hosted tools, allowing real-time, modular task execution. Here is how it works:
This structure means you can easily swap out an agent for a new version or a completely different agent built on another framework without having to rewrite the entire system.
The Core Principles of ACP
To implement ACP, you need to understand its fundamental building blocks. The protocol standardises communication through a few key components that ensure every message is structured, clear, and actionable.
ACPMessage Data Class
The heart of the protocol is the ACPMessage data class. This is a standardised format for all messages sent between agents. It ensures that every communication packet contains the necessary information for it to be understood and routed correctly. A typical ACPMessage includes:
Performatives
A performative is a verb that defines the purpose of the message. It tells the receiving agent what kind of action or response is expected. Common performatives include:
ACPAgent
The ACPAgent is the base class for any agent participating in the system. It defines the agent's identity and its core capabilities, such as sending and receiving ACPMessages. Each agent has a unique name or ID that allows the system to route messages to it.
ACPMessageBroker
In a system with many agents, you need a central post office to handle all the message traffic. The ACPMessageBroker serves this purpose. It's a central routing component that receives messages from agents and ensures they are delivered to the correct recipient. This broker architecture is key to making the system scalable and manageable.
A Coding Guide to Your First ACP System

Now, let's get our hands dirty and build a simple, ACP-compliant messaging system in Python. This tutorial will use Google's Gemini API for natural language processing, as demonstrated in the original implementation.
Step 1: Setting Up Your Environment
First, you need to install the necessary Python library for interacting with Google's generative AI models.
pip install google-generativeaiYou will also need to configure your API key to authenticate your requests.
Step 2: Defining the Core ACP Components
Let's translate the core ACP concepts into Python code. We'll start by defining our message structure.
# Define the ACP Message Structure using a dataclass
from dataclasses import dataclass, field
from typing import Any, Dict, Optional
import uuid

@dataclass
class ACPMessage:
    """A standard message format for Agent Communication Protocol."""
    sender: str
    receiver: str
    performative: str
    content: Any
    message_id: str = field(default_factory=lambda: str(uuid.uuid4()))
    conversation_id: Optional[str] = None
    metadata: Dict[str, Any] = field(default_factory=dict)

    def create_reply(self, sender: str, performative: str, content: Any) -> 'ACPMessage':
        """Helper to create a reply to this message."""
        return ACPMessage(
            sender=sender,
            receiver=self.sender,
            performative=performative,
            content=content,
            conversation_id=self.conversation_id or self.message_id
        )
Next, we define the ACPAgent class. Each agent will have a name and a method to handle incoming messages.
# Define the base class for an ACP Agent
class ACPAgent:
    """Base class for an agent in an ACP system."""
    def __init__(self, name, broker):
        self.name = name
        self.broker = broker
        self.broker.register_agent(self)

    def send_message(self, message: ACPMessage):
        """Sends a message through the broker."""
        print(f"[{self.name}] Sending message to {message.receiver}: {message.performative}")
        self.broker.route_message(message)

    def receive_message(self, message: ACPMessage):
        """Processes an incoming message."""
        print(f"[{self.name}] Received message from {message.sender}: {message.performative}")
        # Agent-specific logic goes here
        pass
Finally, we create the ACPMessageBroker to manage communication.
# Define the Message Broker for routing messages
class ACPMessageBroker:
    """A central broker to route messages between agents."""
    def __init__(self):
        self.agents: Dict[str, ACPAgent] = {}

    def register_agent(self, agent: ACPAgent):
        """Adds a new agent to the network."""
        print(f"[Broker] Registering agent: {agent.name}")
        self.agents[agent.name] = agent

    def route_message(self, message: ACPMessage):
        """Routes a message to the intended recipient."""
        recipient_agent = self.agents.get(message.receiver)
        if recipient_agent:
            recipient_agent.receive_message(message)
        else:
            print(f"[Broker] Error: Agent '{message.receiver}' not found.")
Step 3: Creating and Implementing Agents
With the framework in place, we can create specialised agents. Let's make a Researcher Agent that can answer questions and a Manager Agent that queries it.
import google.generativeai as genai
# Configure your Gemini API key
# genai.configure(api_key="YOUR_API_KEY")

class ResearcherAgent(ACPAgent):
    """An agent that uses a generative model to answer queries."""
    def __init__(self, name, broker):
        super().__init__(name, broker)
        # self.model = genai.GenerativeModel('gemini-pro')

    def receive_message(self, message: ACPMessage):
        super().receive_message(message)
        if message.performative == "QUERY":
            question = message.content
            # For demonstration, we'll use a canned response.
            # In a real scenario, you would call the model:
            # response_text = self.model.generate_content(question).text
            response_text = f"My analysis on '{question}' indicates a positive outlook."

            reply = message.create_reply(
                sender=self.name,
                performative="INFORM",
                content=response_text
            )
            self.send_message(reply)

class ManagerAgent(ACPAgent):
    """An agent that delegates tasks and queries other agents."""
    def receive_message(self, message: ACPMessage):
        super().receive_message(message)
        if message.performative == "INFORM":
            print(f"[{self.name}] Got a response: {message.content}")

    def start_task(self, topic: str):
        """Starts a new task by querying the researcher."""
        print(f"[{self.name}] Initiating research on: {topic}")
        query_message = ACPMessage(
            sender=self.name,
            receiver="Researcher_1",
            performative="QUERY",
            content=f"What is the market trend for {topic}?",
            conversation_id=str(uuid.uuid4())
        )
        self.send_message(query_message)
Step 4: Running the System
Now, let's put it all together and see it in action.
# Main execution block
if __name__ == "__main__":
    # 1. Initialise the broker
    message_broker = ACPMessageBroker()

    # 2. Create and register agents
    manager = ManagerAgent("Manager_Alpha", message_broker)
    researcher = ResearcherAgent("Researcher_1", message_broker)

    # 3. Kick off a task
    manager.start_task("AI-powered SEO tools")
When you run this code, you will see the manager agent send a query, the broker route it to the researcher, the researcher process it and send a reply, and the broker route the reply back to the manager. This simple interaction demonstrates a robust, decoupled communication flow.
Scaling Your System with Advanced Workflows
The real power of ACP becomes clear when you scale up from two agents to many, creating complex workflows. The protocol supports advanced patterns like sequential and hierarchical chains.
This ability to build modular, interconnected systems is a game-changer. It allows teams to develop and maintain their own agents independently, knowing they will plug seamlessly into the larger system thanks to the common protocol.
ACP in the Real World: The Case for SEO
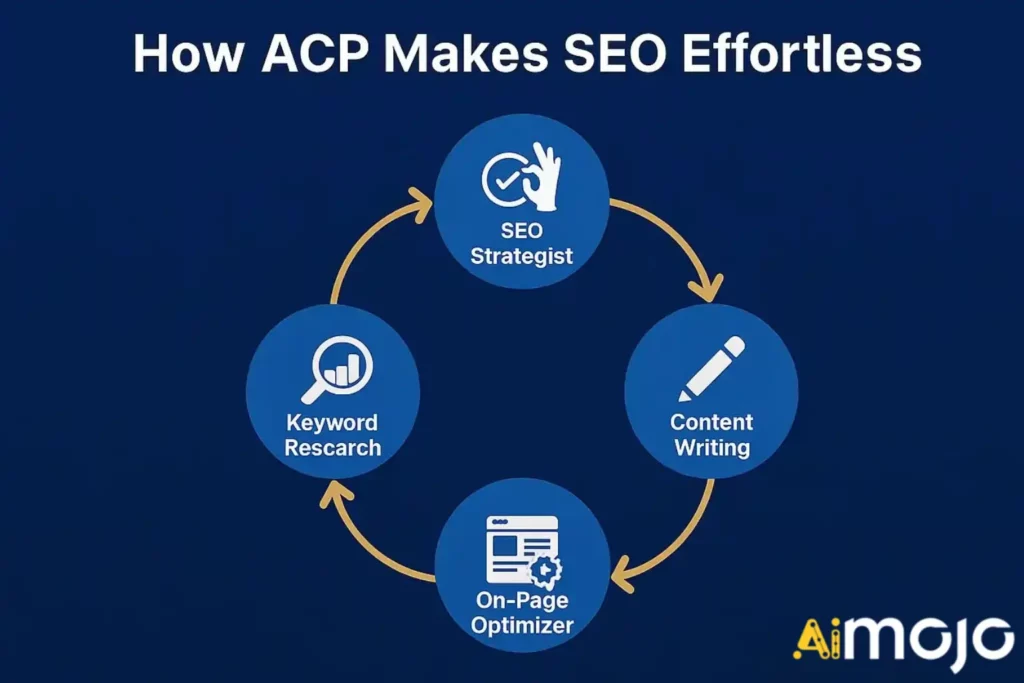
The principles of ACP are not just theoretical; they have direct applications in business automation. Consider the field of Search Engine Optimisation (SEO). A modern SEO strategy involves many moving parts: keyword analysis, content creation, on-page optimisation, and backlink tracking.
A multi-agent system powered by ACP could automate this entire process. Imagine a system with:
- An SEO Strategist Agent that monitors search trends and identifies content gaps.
- A Keyword Research Agent that finds high-value primary and LSI keywords.
- A Content Writing Agent that generates articles based on briefs from the strategist.
- An On-Page Optimisation Agent that checks the content for readability, keyword density, and semantic relevance.
With ACP, these agents could communicate flawlessly. The strategist agent could send a REQUEST to the research agent for keywords, which then sends an INFORM message with its findings to the writing agent. This modularity makes the entire SEO workflow more efficient and scalable.
Conclusion
Building collaborative AI systems is one of the most exciting frontiers in technology. However, without a common communication standard, these systems risk becoming tangled messes of custom integrations. The Agent Communication Protocol (ACP) provides a clean, robust, and scalable solution to this problem.
By standardising how agents interact through a simple client-server model and a well-defined message structure, ACP enables developers to build flexible and powerful multi-agent applications. As demonstrated in our Python guide, implementing a basic ACP system is straightforward.
From there, you can scale to create sophisticated, hierarchical workflows that can tackle complex tasks in fields ranging from software development to SEO. Adopting a protocol like ACP is a vital step towards a future where intelligent agents collaborate seamlessly to help us achieve our goals.


 BONUS: Get our $200 “AI Mastery Toolkit” FREE when you sign up!